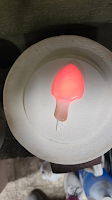
Fusing glass in a microwave? Yep, you can do it!
The results are small, and the process has some quirks, but it’s a surprisingly satisfying way to use up your glass scraps. Making colorful little glass blobs is weirdly addictive—and you don’t need a big studio setup to start. Let’s jump in.
What You’ll Need
.jpg) |
| pendant necklaces |
- A microwave (best practice: use a separate microwave just for fusing)
-
Microwave kiln (the ceramic dome kind—some come with starter supplies)
-
Glass scraps (COE 90 or 96 preferred for consistent results; mixed or unknown COEs may crack)
-
Kiln paper (prevents glass from sticking; most kits come with a few sheets to start)
- Heat-resistant gloves or silicone hot mitts
- Kiln posts or risers to lift the kiln off the microwave plate (some folks remove or flip the plate—double-check your model's instructions)
- Fireproof surface to cool the kiln on (like a fire brick or ceramic tile)
- Paper and pen for taking notes—timing and results can vary a lot by microwave
- Finishing touches: Magnets, jewelry bails, wire for wrapping
Safety First
This isn’t an exhaustive list, but here are the big ones:
-
Read all the instructions that came with your kiln. Now, read them again—every model is a little different.Hot Hot Hot! -
The kiln and glass get HOT—up to 1500°F. Use mitts and caution.
-
Never place a hot kiln directly on your counter. Use a fireproof cooling surface.
-
Keep pets and kids far away while you’re working and cooling.
-
The powder left behind from kiln paper can irritate your lungs. Handle gently and avoid breathing it in. (Best practice: wear a mask.)
How to Use a Microwave Kiln
-
Prep your space. Make sure your microwave is clean, your kiln paper is cut to fit the kiln base, and your safety gear is nearby.
-
Place kiln paper on the base.
-
Layer your glass. Stack 2–3 layers of glass, keeping pieces at least ¼" from the edge. Don’t stack too high—glass naturally wants to settle around ¼" thick.
-
Start heating. Begin with a short cycle at 70% power to ease the glass into the fusing process.
-
After several cycles, you’ll see an orange glow through the vent—your glass is hot and fusing. If you peek between cycles, be quick—letting heat escape can mess up the process.
- Once the glass looks fully fused, carefully remove the kiln (with mitts!) and set it on a fireproof surface. Do not open the lid. Let it cool completely—this can take over an hour.
-
Cool it down slowly. Rapid cooling can cause cracks. Be patient.
-
Once cool, lift the lid gently and remove your fused glass.
-
The kiln paper will have turned powdery—brush it away gently and avoid inhaling it. (Best practice: wear a mask.)
-
Wash your fused piece with mild soap and water.
 |
| Cool! |
Wrap-Up
Microwave fusing is a great way to play, experiment, and use up scrap glass in a low-stress way. Have you tried it yet? I’d love to see what you’ve made—tag me or send a message with your favorite fused blobs, jewelry, or decor!
And, if kilns aren't your thing, check this article for some alternative ideas for upcycling stained glass scraps!


.jpg)
.jpg)

.jpg)
No comments:
Post a Comment